***** On Monday, 9/10/18, I started learning the fundamentals of JavaScript on sololearn.com. *****
***** On Saturday, 1/12/19, I completed the JavaScript Tutorial course and was issued the certificate. *****
TAKE NOTE THAT THIS IS NOT A .JS FILE BECAUSE IT WILL BE A PLAIN TEXT FILE. INSTEAD, JAVASCRIPT WILL BE IMPLEMENTED INTO A .HTML FILE. THIS CAN BE DONE VIA INTERNAL JAVASCRIPT OR EXTERNAL JAVASCRIPT.
ECMAScript6
ECMAScript6 (ES) is a scripting language specification created to standardize JavaScript.
The Sixth Edition, initially known as ECMAScript6 (ES6) and later renamed to ECMAScript 2015, adds significant new syntax for writing complex applications, including classes and modules, iterators and for/of loops, generators, arrow functions, binary data, typed arrays, collections (maps, sets and weak maps), promises, number and math enhancements, reflection, and proxies.
In other words, ES6 is a superset of JavaScript (ES5). The reason that ES6 became so popular is that it introduced new conventions and OOP (Object-Oriented Programming) concepts such as classes.
var & let
In ES6, we have three ways of declaring variables:
Syntax:
var a = 10;
const b = 'hello';
let c = true;
The type of declaration used depends on the necessary scope. Scope is the fundamental concept in all programming languages that defines the visibility of a variable.
var & let
Unlike the var keyword, which defines a variable globally, or locally
to an entire function regardless of block scope, let allows you to declare variables that are limited in scope to the
block, statement, or expression in which they are used.
For example:
→ JavaScript Code in JS ←
if (true) {
let name = 'Jack';
}
alert(name); //generates an error
In this case, the name variable is accessible only in the scope of the if statement because it was declared as let.
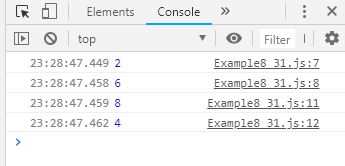
To demonstrate the difference in scope between var and let, consider this example:
→ JavaScript Code in JS ←
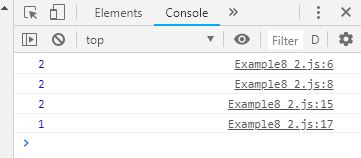
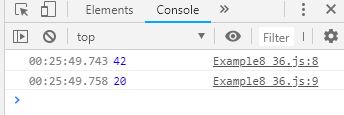
function varTest() {
var x = 1;
if (true) {
var x = 2; // same variable
console.log(x); // 2
}
console.log(x); // 2
}
function letTest() {
let x = 1;
if (true) {
let x = 2; // different variable
console.log(x); // 2
}
console.log(x); // 1
}
Since the console.log method is used, in order to see the above results, be sure to have the console view visible (Press F12 to view the console).
console.log result:
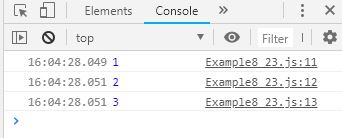
One of the best uses for let is in loops:
→ JavaScript Code in JS ←
for (let i = 0; i < 3; i++) {
document.write(i);
}
Here, the i variable is accessible only within the scope of the for loop, where it is needed.
const
const variables have the same scope as variable declared using let. The difference is that const
variables are immutable - they are not allowed to be reassigned.
For example, the following generates an exception:
→ JavaScript Code in JS ←
const a = 'Hello';
a = 'Bye';
Template Literals in ES6
Template literals are a way to output variables in the string.
Prior to ES6, we had to break the string, for example:
→ JavaScript Code in JS ←
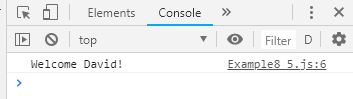
let name = 'David';
let msg = 'Welcome' + name + '!';
console.log(msg);
console.log result: (F12)
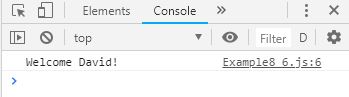
ES6 introduces a new way of outputting variable values in strings. The same code above can be rewritten as:
→ JavaScript Code in JS ←
let name = 'David';
let msg = `Welcome ${name}!`;
console.log(msg);
console.log result: (F12)
Notice that template literals are enclosed by the backtick (' ') character
instead of double or single quotes.
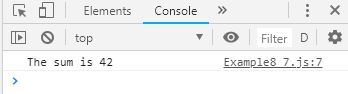
The ${expression} is a placeholder, and can include any expression, which will get evaluated
and inserted into the template literal.
For example:
→ JavaScript Code in JS ←
let a = 8;
let b = 34;
let msg = 'The sum is ${a+b}';
console.log(msg);
console.log result: (F12)
Loops in ECMAScript6
In JavaScript, we commonly use the for loop to iterate over values in a list:
→ JavaScript Code in JS ←
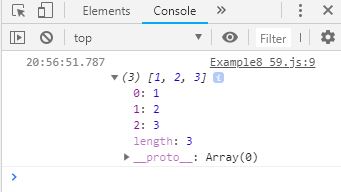
let arr = [1, 2, 3];
for (let k = 0; k < arr.length; k++) {
console.log(arr[k]);
}
console.log result: (F12)
The for...in loop is intended for iterating over the enumerable keys of an object.
For example:
→ JavaScript Code in JS ←
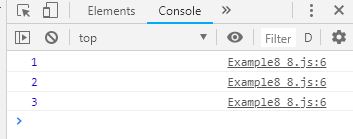
let obj = {a: 1, b: 2, c: 3};
for (let v in obj) {
console.log(v);
}
console.log result: (F12)
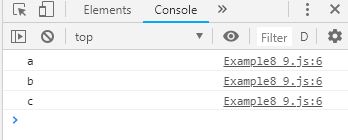
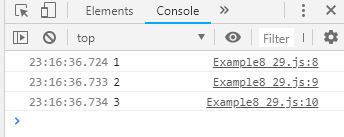
ES6 introduces the new for...of loop, which creates a loop iterating over iterable objects.
For example:
→ JavaScript Code in JS ←
let list = ["x", "y", "z"];
for (let val of list) {
console.log(val);
}
console.log result: (F12)
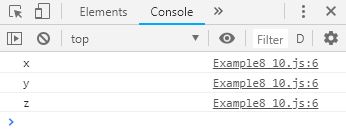
During each iteration, the val variable is assigned the corresponding element in the list.
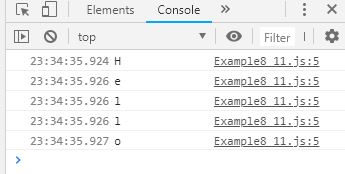
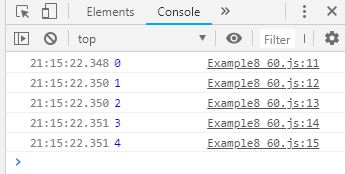
The for...of loop works for other iterable objects as well, including strings:
→ JavaScript Code in JS ←
for (let ch of "Hello") {
console.log(ch);
}
console.log result: (F12 and show timestamps)
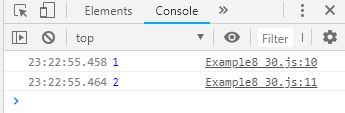
Functions in ECMAScript 6
Prior to ES6, a JavaScript function was defined like this:
→ JavaScript Code in JS ←
function add(x, y) {
var sum = x+y;
console.log(sum);
}
console.log result: (F12 and show timestamps)
ES6 introduces a new syntax for writing functions. The same function from above can be written as:
→ JavaScript Code in JS ←
const add = (x, y) => {
let sum = x + y;
console.log(sum);
}
console.log result: (F12 and show timestamps)
This new syntax is quite handy when you just need a simple function with one argument.
You can skip typing function and return, as well as some parentheses and braces.
For example:
Syntax:
const greet = x => "Welcome" + x;
→ ←Te code above defines a function named greet that has one argument and returns a message.
If there are no parameters, an empty pair of parentheses should be used, as in
Syntax:
const x = () => alert("Hi");
→ ←The syntax is very useful for inline functions. For example, let's say we have an array, and for each element of the array we need to execute a function. We use the forEach method of the array to call a function for each element:
→ JavaScript Code in JS ←
var arr = [2, 3, 7, 8];
arr.forEach(function(el) {console.log result: (F12 and show timestamps)
However, in ES6, the code above can be rewritten as following:
→ JavaScript Code in JS ←
const arr = [2, 3, 7, 8];
arr.forEach(v => {console.log result: (F12 and show timestamps)
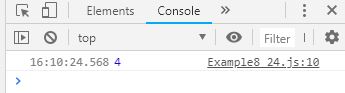
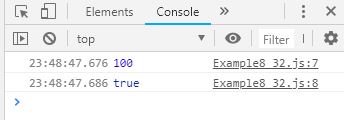
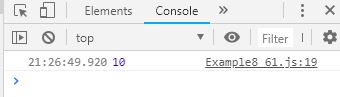
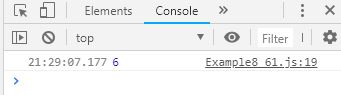
Default Parameters in ES6
In ES6, we can put the default values right in the signature of the functions.
For example:
→ JavaScript Code in JS ←
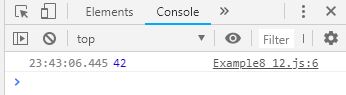
function test(a, b = 3, c = 42) {
return a + b + c;
}
console.log(test(5)); //50
console.log result: (F12 and show timestamps)

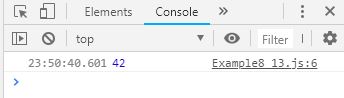
And here's an example of an arrow function with default parameters:
Syntax:
const test = (a, b = 3, c = 42) => {
return a + b + c;
}
console.log(test(5)); //50
ES6 Objects
JavaScript variables can be Object data types that contain many values called properties.
An object can also have properties that are function definitions called methods for
performing actions on the object.
ES6 introduces shorthand notations and computed property names that make declaring and using
objects easier to understand.
The new method definition shorthand does not require the colon (:) or function keyword, as in the grow function of the tree object declaration:
→ JavaScript Code in JS ←
let tree = {
height: 10,
color: 'green',
grow() {
this.height += 2;
}
};
tree.grow()
console.log(tree.height); // 12
console.log result: (F12 and show timestamps)
You can also use a property value shorthand when initializing properties with a variable
by the same name.
For example, properties height and health are being initialized with variables named
height and health:
→ JavaScript Code in JS ←
let height = 5;
let health = 100;
let athlete = {
height,
health
};
console.log result: (F12 and show timestamps)
When creating an object by using duplicate property names, the last property will
overwrite the prior ones of the same name.
For example:
Syntax:
var a = {x: 1, x: 2, x:3, x: 4};
→ ←console.log result: (F12 and show timestamps)
Computed Property Names
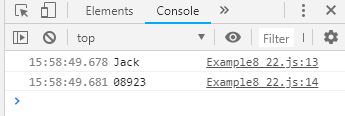
With ES6, you can now used computed property names. Using the square bracket notation [], we can use an expression for a property name, including concatenating strings. This can be useful in cases where we want to create certain objects based on user data (e.g. id, email, and so on).
Here are three examples:
Example 1:
→ JavaScript Code in JS ←
let prop = 'name';
let id = '1234';
let mobile = '08923'
let user = {
[prop]: 'Jack',
['user_${id}']: '${mobile}'
};
console.log result: (F12 and show timestamps)
Example 2:
→ JavaScript Code in JS ←
var i = 0;
var a = {
['foo' + ++i]: i,
['foo' + ++i]: i,
['foo' + ++i]: i
};
console.log result: (F12 and show timestamps)
Example 3:
→ JavaScript Code in JS ←
var param = 'size';
var config = {
[param]: 12,
['mobile' + param.charAt(0).toUpperCase() + param.slice(1)]: 4
};
console.log(config);
console.log result: (F12 and show timestamps)
Object.assign() in ES6
ES6 adds a new Object method assign() that allows us to combine
multiple sources into one target to create a single new object.
Object.assign() is also useful for creating a duplicate of an existing object.
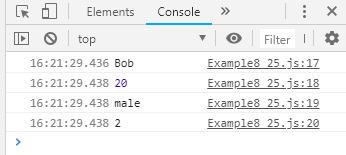
Let's look at the following example to see how to combine objects:
→ JavaScript Code in JS ←
let person = {
name: 'Jack',
age: 18,
sex: 'male'
};
let student = {
name: 'Bob',
age: 20,
xp: '2'
};
let newStudent = Object.assign({}, person, student);
console.log result: (F12 and show timestamps)
Here we used the Object.assign() where the first parameter is the target object
you want to apply new properties to.
Every parameter after the first will be used as sources for the target. There are no limitations on the number of source
parameters. However, order is important because properties in the second parameter will be overridden by properties of the same
name in the third parameter, and so on.
In the example above, we used a new object {} as the target and used two objects as sources.
Now let's see how we can use assign() to create a duplicate object without creating
a reference (mutating) to the base object.
In the following example, assignment was used to try to generate a new object. However, using = creates
a reference to the base object. Because of this reference, changes intended for a new
object mutate the original object:
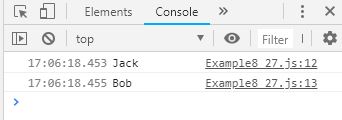
→ JavaScript Code in JS ←
let person = {
name: 'Jack',
age: 18,
};
let newPerson = person; // newPerson references person
newPerson.name = 'Bob';
console.log(person.name); // Bob
console.log(newPerson.name); // Bob
console.log result: (F12 and show timestamps)
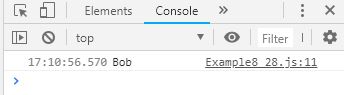
To avoid this (mutations), use Object.assign() to create a new object.
For example:
→ JavaScript Code in JS ←
let person = {
name: 'Jack',
age: 18,
};
let newPerson = Object.assign({}, person);
newPerson.name = 'Bob';
console.log(person.name); // Jack
console.log(newPerson.name); // Bob
console.log result: (F12 and show timestamps)
Finally, you can assign a value to an object property in the Object.assign() statement.
For example:
→ JavaScript Code in JS ←
let person = {
name: 'Jack',
age: 18,
};
let newPerson = Object.assign({}, person, {name: 'Bob'});
→ ←console.log result: (F12 and show timestamps)
ES6 Destructuring
The destructuring assignment syntax is a JavaScript expression that makes it possible to unpack values from arrays,
or properties from objects, into distinct variables.
ES6 has added a shorthand syntax: for destructuring an array.
The following example demonstrates how to unpack the elements of an array into distinct variables:
→ JavaScript Code in JS ←
let arr = ['1', '2', '3'];
let [one, two, three] = arr;
console.log(one); // 1
console.log(two); // 2
console.log(three); // 3
console.log result: (F12 and show timestamps)
We can also destructure an array returned by a function.
For example:
→ JavaScript Code in JS ←
let a = () => {
return [1, 3, 2];
};
let [one, , two] = a();
→ ←console.log result: (F12 and show timestamps)
Notice that we left the second argument's place empty.
The destructuring syntax also simplifies assignment and swapping values:
→ JavaScript Code in JS ←
let a, b, c = 4, d = 8;
[a, b = 6] = [2]; // a = 2, b = 6
[c, d] = [d, c]; // c = 8, d = 4
→ ←console.log result: (F12 and show timestamps)
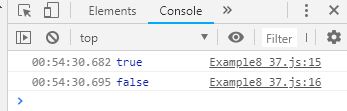
Object Destructuring in ES6
Similar to Array destructuring, Object destructuring unpacks properties into distinct variables.
For example:
→ JavaScript Code in JS ←
let obj = {h: 100, s: true};
let {h, s} = obj;
console.log(h); // 100
console.log(s); // true
console.log result: (F12 and show timestamps)
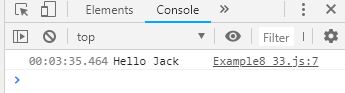
We can assign without declaration, but there are some syntax requirements for that:
→ JavaScript Code in JS ←
let a, b;
({a, b} = {a: 'Hello', b: 'Jack'});
console.log(a + b); // Hello Jack
→ ←console.log result: (F12 and show timestamps)
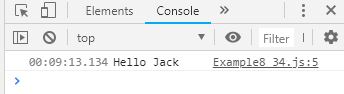
The () with a semicolon (;) at the end are mandatory when destructuring without a declaration.
However, you can also do it as follows where the () are not required:
→ JavaScript Code in JS ←
let {a, b} = {a: 'Hello', b: 'Jack'};
console.log(a + b); // Hello Jack
console.log result: (F12 and show timestamps)
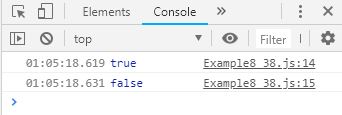
You can also assign the object to new variable names.
For example:
→ JavaScript Code in JS ←
var o = {h: 42, s: true};
var {h: foo, s: bar} = o;
// console.log(h); // Error
console.log(foo); // 42
console.log result: (F12 and show timestamps)

Finally, you can assign default values to variables, in case the value unpacked from the
object is undefined.
For example:
→ JavaScript Code in JS ←
var obj = {id: 42, name: "Jack"};
let {id = 10, age = 20} = obj;
console.log(id); // 42
console.log(age); // 20
console.log result: (F12 and show timestamps)
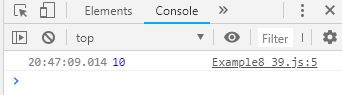
ES6 Rest Parameters
Prior to ES6, if we wanted to pass a variable number of arguments to a function, we could use the
arguments object, an array-like object,
to access the parameters passed to the function.
For example, let's write a function that checks if an array contains all the arguments passed:
→ JavaScript Code in JS ←
function containsAll(arr) {
for (let k = 1; k < arguments.length; k++) {
let num = arguments[k];
if (arr.indexOf(num) === -1) {
return false;
}
}
return true;
}
let x = [2, 4, 6, 7];
console.log(containsAll(x, 2, 4, 7));
console.log(containsAll(x, 6, 4, 9));
console.log result: (F12 and show timestamps)
We can pass any number of arguments to the function and access it using the arguments object.
While this does the job, ES6 provides a more readable syntax to achieve variable number of parameters by using a rest parameter:
→ JavaScript Code in JS ←
function containsAll(arr, ...nums) {
for (let num of nums) {
if (arr.indexOf(num) === -1) {
return false;
}
}
return true;
}
console.log result: (F12 and show timestamps)
The ...nums parameter is called a rest parameter. It takes all the "extra" arguments passed to the function. The three dots (...) are called the Spread operator.
The Spread Operator
This operator is similar to the Rest Parameter, but it has another purpose when used in objects or arrays or function calls (arguments).
Spread in function calls
It is common to pass the elements of an array as arguments to a function. Before ES6, we used
the following method:
→ JavaScript Code in JS ←
function myFunction(w, x, y, z) {
console.log(w + x + y + z);
}
var args = [1, 2, 3];
myFunction.apply(null, args.concat(4));
console.log result: (F12 and show timestamps)
ES6 provides an easy way to do the example above with spread operators:
→ JavaScript Code in JS ←
const myFunction(w, x, y, z) => {
console.log(w + x + y + z);
};
let args = [1, 2, 3];
myFunction(...args, 4);
console.log result: (F12 and show timestamps)
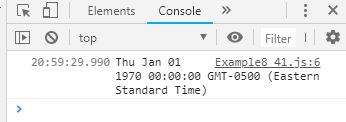
Example:
→ JavaScript Code in JS ←
var dateFields = [1970, 0, 1]; // 1 Jan 1970
var date = new Date(...dateFields);
console.log(date);
console.log result: (F12 and show timestamps)
Spread in array literals
Before ES6, we used the following syntax to add an item at middle of an array:
→ JavaScript Code in JS ←
var arr = ["One", "Two", "Five"];
arr.splice(2, 0, "Three");
arr.splice(3, 0, "Four");
console.log(arr);
console.log result: (F12 and show timestamps)
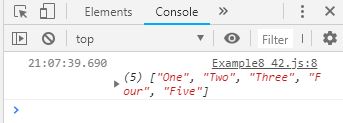
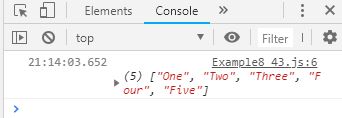
You can use methods such as push, splice, and concat, for example, to achieve this in different positions of the array. However, in ES6, the spread operator lets us do this more easily:
→ JavaScript Code in JS ←
let newArr = ['Three', 'Four'];
let arr = ['One', 'Two', ...newArr, 'Five'];
console.log(arr);
console.log result: (F12 and show timestamps)
Spread in object literals
In objects, it copies the own enumerable properties from the provided object
onto a new object.
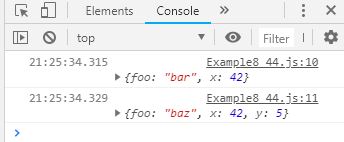
→ JavaScript Code in JS ←
const obj1 = { foo: 'bar', x: 42 };
const obj2 = { foo: 'baz', y: 5 };
const clonedObj = {...obj1}; // { foo: "bar", x: 42 }
const mergedObj = {...obj1, ...obj2}; // { foo: "baz", x: 42, y: 5 }
console.log result: (F12 and show timestamps)
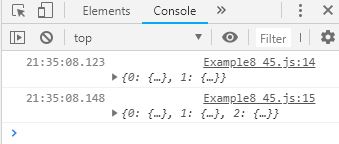
However, if you try to merge them, you will not get the result you expected:
→ JavaScript Code in JS ←
const obj1 = { foo: 'bar', x: 42 };
const obj2 = { foo: 'baz', y: 5 };
const merge = (...objects) => ({...objects});
let mergedObj = merge(obj1, obj2);
// { 0: { foo: 'bar', x: 42 }, 1: { foo: 'baz', y: 5 } }
let mergedObj2 = merge({}, obj1, obj2);
// { 0: {}, 1 { foo: 'bar', x: 42 }, 2: { foo: 'baz', y: 5 } }
console.log result: (F12 and show timestamps)
Classes in ES6
In this lesson, we'll explain how to create a class that can be used to create multiple objects
of the same structure.
A class uses the keyword class and contains a constructor method for initializing.
For example:
Syntax:
class Rectangle {
constructor(height, width) {
this.height = height;
this.width = width;
}
}
A declared class can then be used to create multiple objects using the keyword new.
For example:
→ JavaScript Code in JS ←
const square = new Rectangle(5, 5);
const poster = new Rectangle(2, 3);
console.log result: (F12 and show timestamps)
You can also define a class with a class expression, where the class can be named or unnamed.
A named class looks like:
→ JavaScript Code in JS ←
var Square = class Rectangle {
constructor(height, width) {
this.height = height;
this.width = width;
}
};
console.log result: (F12 and show timestamps)
In the unnamed class expression, a variable is simply assigned the class definition:
→ JavaScript Code in JS ←
var Square = class {
constructor(height, width) {
this.height = height;
this.width = width;
}
};
console.log result: (F12 and show timestamps)
Class Methods in ES6
ES6 introduced a shorthand that does not require the keyword function for a function assigned to a
method's name. One type of class method is the
prototype method , which is available to objects of the class.
For Example:
→ JavaScript Code in JS ←
class Rectangle {
constructor(height, width) {
this.height = height;
this.width = width;
}
get area() {
return this.calcArea();
}
calcArea() {
return this.height * this.width;
}
}
const square = new Rectangle(5, 5);
console.log(square.area); // 25
console.log result: (F12 and show timestamps)

Another type of method is the static method, which
cannot be called through a class instance.
Static methods are often used to create utility functions for an application.
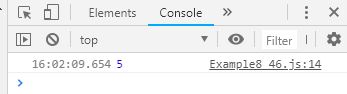
For Example:
→ JavaScript Code in JS ←
class Point {
constructor(x, y) {
this.x = x;
this.y = y;
}
static distance(a, b) {
const dx = a.x - b.x;
const dy = a.y - b.y;
return Math.hypot(dx, dy);
}
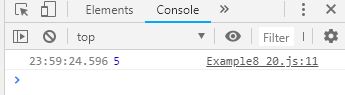
}
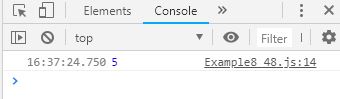
const p1 = new Point(7, 2);
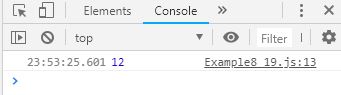
const p2 = new Point(3, 8);
console.log(Point.distance(p1, p2));
→ ←console.log result: (F12 and show timestamps)
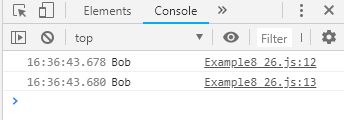
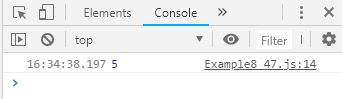
Inheritance in ES6
The extends keyword is used in class declarations or class expressions to create a child of a class. the child
inherits the properties and methods of the parent.
For example:
→ JavaScript Code in JS ←
class Animal {
constructor(name) {
this.name = name;
}
speak() {
console.log(this.name + ' makes a noise.');
}
}
class Dog extends Animal {
speak() {
console.log(this.name + ' barks.');
}
}
let dog = new Dog('Rex');
dog.speak();
console.log result: (F12 and show timestamps)
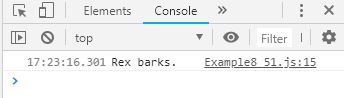
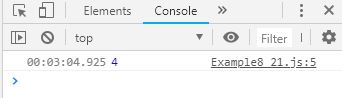
In the code above, the Dog class is a child of the Animal class, inheriting its properties and methods.
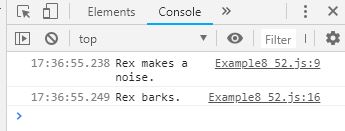
For example, we can modify the program above to the following:
→ JavaScript Code in JS ←
class Animal {
constructor(name) {
this.name = name;
}
speak() {
console.log(this.name + ' makes a noise.');
}
}
class Dog extends Animal {
speak() {
super.speak(); // Super
console.log(this.name + ' barks.');
}
}
let dog = new Dog('Rex');
dog.speak();
console.log result: (F12 and show timestamps)
ES6 Map
A Map object can be used to hold key/value pairs. A key or value in a map can be anything (objects and primitive values).
The syntax newMap([iterable]) creates a Map object where iterable is an array or any other iterable object whose elements are arrays (with a key/value pair each).
An Object is similar to Map but there are important differences that make using a Map preferable in certain cases:
The size property returns the number of key/value pairs in a map.
For example:
Syntax:
let map = new Map([['k1', 'v1'], ['k2', 'v2']]);
console.log(map.size); // 2
→ ←console.log result: (F12 and show timestamps)

Methods
For example:
→ JavaScript Code in JS ←
let map = new Map();
map.set('k1', 'v1').set('k2', 'v2');
console.log(map.get('k1')); // v1
console.log(map.has('k2')); // true
for (let kv of map.entries())
console.log(kv[0] + " : " + kv[1]);
console.log result: (F12 and show timestamps)
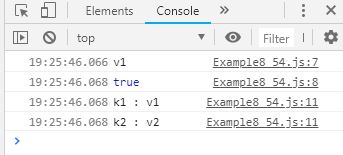
The above example demonstrates some of the ES6 Map methods.
ES6 Set
A Set object can be used to hold unique values (no repetitions are allowed).
A value in a set can be anything (objects and primitive values.).
The syntax new Set([iterable]) creates a Set object where iterable is an array or any other iterable object of values.
The size property returns the number of distinct values in a set.
For example:
Syntax:
let set = new Set([1, 2, 4, 2, 59, 9, 4, 9, 1]);
console.log(set.size); // 5
→ ←console.log result: (F12 and show timestamps)

Methods
For example:
→ JavaScript Code in JS ←
let set = new Set();
set.add(5).add(9).add(59).add(9);
console.log(set.has(9));
for (let v of set.values())
console.log(v);
console.log result: (F12 and show timestamps)
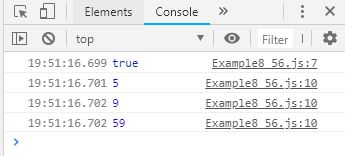
The above example demonstrates some of the ES6 Set methods.
ES6 Promises
A Promise is a better way for asynchronous programming when compared to the common way of using a setTimeout() type of method.
Consider this example:
→ JavaScript Code in JS ←
setTimeout(function() {
console.log("Work 1");
setTimeout(function() {
console.log("Work 2");
}, 1000);
}, 1000);
console.log("End");
console.log result: (F12 and show timestamps)
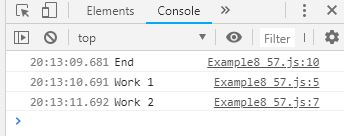
It prints "End", "Work 1", and "Work 2" in that order (the work is done asynchronously). But if there are more events like this, the code becomes very complex.
ES6 comes to the rescue in such situations. A promise can be created as follows:
Syntax:
new Promise(function(resolve, reject) {
// Work
if (success)
resolve(result);
else
reject(Error("failure"));
});
Here, resolve is the method for success and reject is the method for failure.
If a method returns a promise, its calls should use the then method, which takes two methods as input; one for success and the other for the failure.
For Example:
→ JavaScript Code in JS ←
function asyncFunc(work) {
return new Promise(function(resolve, reject) {
if (work === "")
reject(Error("Nothing"));
setTimeout(function() {
resolve(work);
}, 1000);
});
}
asyncFunc("Work 1") // Task 1
.then(function(result) {
console.log(result);
return asyncFunc("Work 2"); // Task 2
}, function(error) {
console.log(error);
})
.then(function(result) {
console.log(result);
}, function(error) {
console.log(error);
});
console.log("End");
console.log result: (F12 and show timestamps)
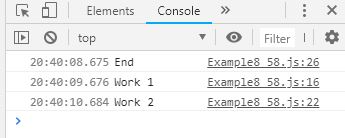
It also prints "End", "Work 1", and "Work 2" (the work is done asynchronously). But, this is clearly more readable than the previous example. In more complex situations, it is easier to work with.
Iterators & Generators
Symbol.iterator is the default iterator for an object. The for...of loops are based on this type of iterator.
In the example below, we will see how we should implement it and how generator functions are used.
Example:
→ JavaScript Code in JS ←
let myIterableObj = {
[Symbol.iterator] : function* () {
yield 1; yield 2; yield 3;
...
console.log([...myIterableObj]);
console.log result: (F12 and show timestamps)

First, we create an object, and use the Symbol.iterator and generator function to fill it with some values.
In the second line of the code, we use a * with the function keyword. It's called a generator function (or gen function).
For example, here is a simple case of how gen functions can be useful:
→ JavaScript Code in JS ←
function* idMaker() {
let index = 0;
while (index < 5)
yield index++;
}
var gen = idMaker();
console.log(gen.next().value);
console.log result: (F12 and show timestamps)
We can exit and re-enter generator functions later. Their variable bindings (context∥ will be saved across re-entrances. They are a very powerful tool for asynchronous programming, especially when combined with Promises. They can also be useful for creating loops with special requirements.
We can nest generator functions inside each other to create more complex structures and pass the arguments while we are calling them.
The example below will show a useful case of how we can use generator functions and Symbol.iterators together.
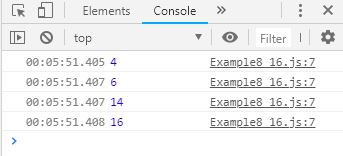
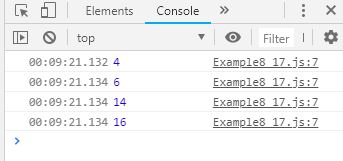
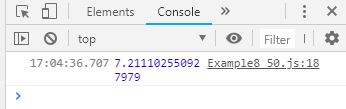
Example:
→ JavaScript Code in JS ←
const arr = ['0', '1', '4', 'a', '9', 'c', '16'];
const my_obj = {
[Symbol.iterator]: function*() {
for(let index of arr) {
yield `${index}`;
}
}
};
const all = [...my_obj]
.map(i => parseInt(i, 10))
.map(Math.sqrt)
.filter((i) => i < 5)
.reduce((i, d) => i + d);
console.log(all);
console.log result: (F12 and show timestamps)
We create an object of 7 elements by using Symbol.iterator and generator functions. In the second part, we assign our object to a constant all. At the end, we print its value.
Modules
It is a good practice to divide your related code into modules. Before ES6 there were some libraries which made this possible (e.g., RequireJS, CommonJS). ES6 is now supporting this feature natively.
Considerations when using modules
The first consideration is maintainability. A module is independent of other modules, making improvements and
expansion possible without any dependency on code in other modules.
The second consideration is namespacing. In an earlier lesson, we talked about variables and scope. As you know, vars are globally declared, so it's common to have namespace pollution where unrelated variables are accessible all over our code. Modules solve this problem by creating a private space for variables.
Another important consideration is reusability. When we write code that can be used in other projects, modules make it possible to easily reuse the code without having to rewrite it in a new project.
Let's see how we should use modules in JS files.
For Example:
Syntax:
// lib/math.js
export let sum = (x, y) => { return x + y; }
export let pi = 3.14;
// app.js
import * as math from "lib/math"
console.log(`2p = + ${math.sum(math.pi, math.pi)}`)
Here we are exporting the sum function and the pi variable so we can use them in different files.
Built-in Methods
ES6 also introduced new built-in methods to make several tasks easier. Here we will cover the most common ones.
Array Element Finding
The legacy way to find the first element of an array by its value and a rule was the following:
→ JavaScript Code in JS ←
var value = [4, 5, 1, 8, 2, 0].filter(function (x) {
return x > 3;
})[0];
console.log(value);
console.log result: (F12 and show timestamps)

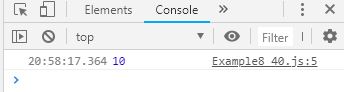
The new syntax is cleaner and more robust:
→ JavaScript Code in JS ←
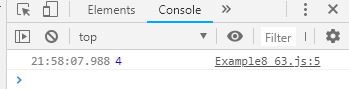
let value = [4, 5, 1, 8, 2, 0].find(x => x > 3);
console.log(value);
console.log result: (F12 and show timestamps)
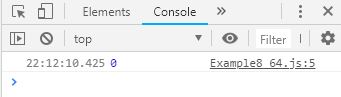
You can also get the index of the item above by using the findIndex() method
→ JavaScript Code in JS ←
let value = [4, 5, 1, 8, 2, 0].findIndex(x => x > 3);
console.log(value);
console.log result: (F12 and show timestamps)
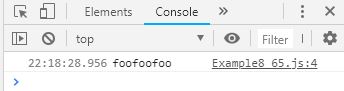
Repeating Strings
Before ES6 the following syntax was the correct way to repeat a string multiple times:
Syntax:
console.log(Array(3 + 1).join("foo")); // foofoofoo
→ ←console.log result: (F12 and show timestamps)
With the new syntax, it becomes:
Syntax:
console.log("foo".repeat(3)); // foofoofoo
→ ←console.log result: (F12 and show timestamps)

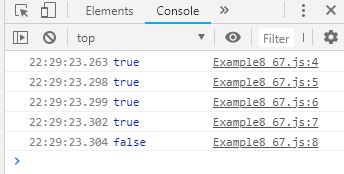
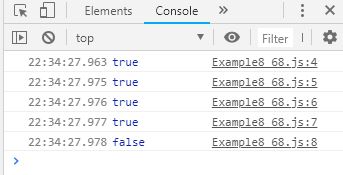
Searching Strings
Before ES6 we only used the indexOf() method to find the position of the text
in the string. For example:
Syntax:
"SoloLearn".indexOf("Solo") === 0; // true
"SoloLearn".indexOf("Solo") === (4 - "Solo".length); // true
"SoloLearn".indexOf("loLe") !== -1; // true
"SoloLearn".indexOf("olo", 1) !== -1; // true
"SoloLearn".indexOf("olo", 2) !== -1; // false
console.log result: (F12 and show timestamps)
ES6 has replaced this with a version that has cleaner and more simplified syntax:
Syntax:
"SoloLearn".startsWith("Solo", 0); // true
"SoloLearn".endsWith("Solo", 4); // true
"SoloLearn".includes("loLe"); // true
"SoloLearn".includes("olo", 1); // true
"SoloLearn".includes("olo", 2); // false
console.log result: (F12 and show timestamps)
Go to top
« Previous
1
2
3
4
5
6
7
8
Next »